Try a walk-in shower in a small bathroom
Definition and characteristics
The walk-in shower is much more than just a decorative trend. It is a bathroom fixture characterized by the absence of a raised tray and full walls. Its fundamental principle is based on a floor that is perfectly level with the rest of the room, creating visual continuity that frees up space.
This configuration has several distinctive features. First, the shower tray is usually tiled and installed at the same level as the floor, with a slight slope towards the drain. In addition, walk-in showers can be equipped with a fixed or movable glass wall, or in some cases, no partition at all. Access is particularly easy, with no steps or obstacles, making it an ideal solution for people with reduced mobility.
Differences from a conventional shower
Compared to a traditional shower, a walk-in shower has some notable differences. A classic shower enclosure usually has a raised tray that is about 6 inches high and full walls on all sides. This configuration creates a visual barrier that segments the space and gives the impression of reduced volume.
Conversely, the modern walk-in shower blends seamlessly into the floor. What's more, its minimalist walls, often made of transparent glass, preserve the visual perspective of the entire room. However, installing a walk-in shower requires more complex floor preparation to ensure waterproofing and effective drainage.
Another major difference is that walk-in showers offer greater design freedom. Unlike standard shower enclosures, they can be adapted to virtually any space configuration, even the most unusual ones.
Why it appeals in small spaces
Contrary to popular belief, walk-in showers are particularly well suited to small bathrooms. The absence of a raised shower tray and full walls creates a feeling of increased space, even in a small shower room.
The integration of the floor-level shower tray eliminates visual breaks and allows the entire floor surface to be seen, making the room appear larger. Similarly, the continuous tiling between the shower and the rest of the bathroom reinforces this impression of a unified, larger space.
Transparent glass walls, often used in walk-in showers, are also a major asset for small spaces. They allow light and visibility to pass through, avoiding the "boxy" effect of enclosed shower stalls. In the most cramped configurations, you can even opt for a walk-in shower without walls, further maximizing the feeling of space.
Another significant advantage is that the smaller walk-in shower fits into irregular or corner spaces where a standard shower enclosure would not fit harmoniously. In particular, corner or niche models make intelligent use of every available centimeter.
Finally, choosing the right tiles for your walk-in shower can also help create a feeling of space. Large tiles, laid continuously from floor to wall, create a visual enlargement effect that is particularly effective in small spaces.
Configurations suitable for small bathrooms
To install a walk-in shower in a small space, choosing the right configuration is essential. Each solution has specific advantages and adapts differently to the constraints of a small bathroom. Let's take a look at the three most effective configurations for optimizing your space.
Open corner shower
The open corner shower is an ideal solution for small bathrooms. This configuration involves positioning the shower in a corner of the room with a single glass wall, leaving one side completely open. This layout creates a feeling of space while limiting the footprint.
However, this type of layout has one drawback to consider: in its most compact version (80 cm wide), splashes can occur in the rest of the bathroom. Therefore, for a truly functional open corner shower, opt for a minimum width of 90 cm.
For small spaces, a standard size of 90 × 90 cm is a good compromise between comfort and space optimization. However, if you have a little more room, a 90 × 120 cm configuration offers greater comfort without sacrificing too much floor space.
Shower with fixed side panel
If space is particularly limited but you want to avoid splashes, the configuration with a fixed side panel is an excellent alternative. This variant is also placed in the corner of the room but has an additional panel that offers better protection against water splashes.
The wall-mounted version with a fixed side panel ensures easy access to the shower while clearly defining the space. This configuration is particularly suitable for narrow bathrooms where every inch counts. It allows for smooth entry and exit from the shower, while effectively protecting the rest of the room.
For a walk-in shower with a fixed side panel, choose a minimum length of 120 to 140 cm for the main wall. This will give you enough space without taking up too much of the bathroom. The recommended standard width is around 90 cm, offering a good balance between comfort and compactness.
Shower in niche
The niche configuration is undoubtedly the best solution for very small bathrooms. This layout involves installing a walk-in shower in a space already enclosed by three walls, simply adding a glass panel on the open side.
This configuration allows you to make smart use of corners or unused spaces in your bathroom. It is particularly suitable when you have a small space against the shortest wall in the room. The major advantage of this layout is that it integrates perfectly with the existing architecture, without requiring any major structural alterations.
For a recessed shower, the dimensions can be perfectly adapted to the available space. A shower tray that fits precisely into the open space, combined with a suitable shower screen, creates the luxurious look of a true walk-in shower, even in a very limited space.
Ultimately, whatever layout you choose for your small bathroom, opt for light colors and transparent materials that help to visually enlarge the space. Glass walls, in particular, help to preserve the visual perspective and brightness of the room, which are essential elements in a small space.
Choosing the right elements to optimize space
The installation of a walk-in shower in a small space is not limited to the overall layout. Careful selection of each component plays a decisive role in maximizing the available space while maintaining functionality and aesthetics.
Extra-flat or built-in shower tray
In a small shower room, the shower tray is the key element to consider carefully. There are two options available to optimize space: an extra-flat shower tray or a recessed shower tray.
The extra-flat shower tray, with a maximum height of 3 cm, creates an almost imperceptible transition to the bathroom floor. Easy to install, it is ideal for renovations where ceiling height is limited. It is also available in a range of materials, including ceramic, resin, and composite quartz, offering a variety of finishes to suit your tastes.
The built-in shower tray, on the other hand, is integrated directly into the floor, creating perfect continuity. However, this option requires more extensive work, as the floor must be dug up for installation. Its main advantage is that it creates a completely seamless look, amplifying the impression of space.
Transparent walls or glass roof
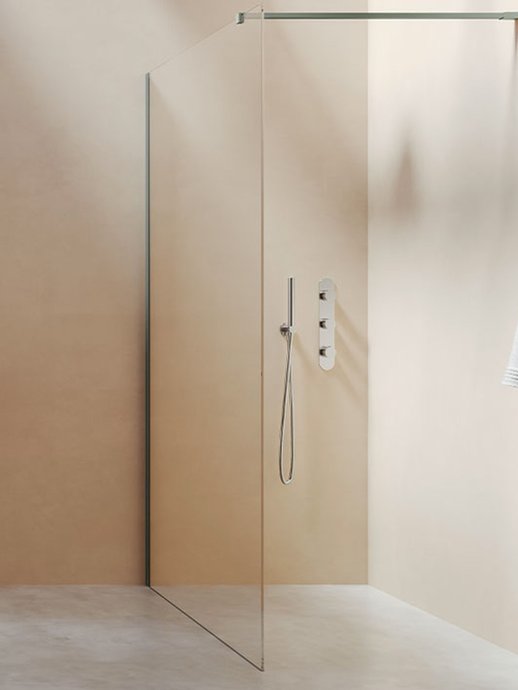
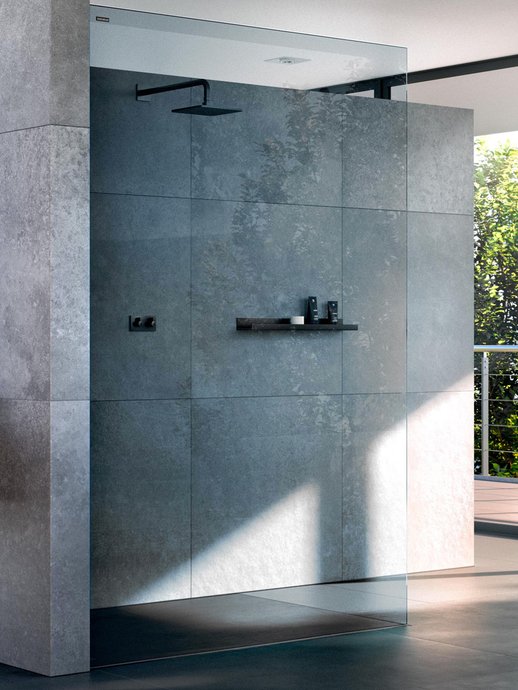
To define your walk-in shower without visually closing off the space, choosing the right shower screen is crucial. Clear glass screens are the ideal solution for small bathrooms, as they do not interrupt the visual perspective.
Choose 6 to 8 mm thick tempered glass for strength and safety. Anti-limescale treatments make maintenance easier, which is an important consideration for everyday use. In addition, minimalist mounting systems, such as ultra-thin profiles or invisible fixings, reinforce the impression of lightness.
The workshop-style glass roof adds a decorative touch while structuring the space. Less transparent than a simple wall, it nevertheless creates an elegant separation without feeling closed in. This intermediate solution effectively combines functionality and aesthetics.
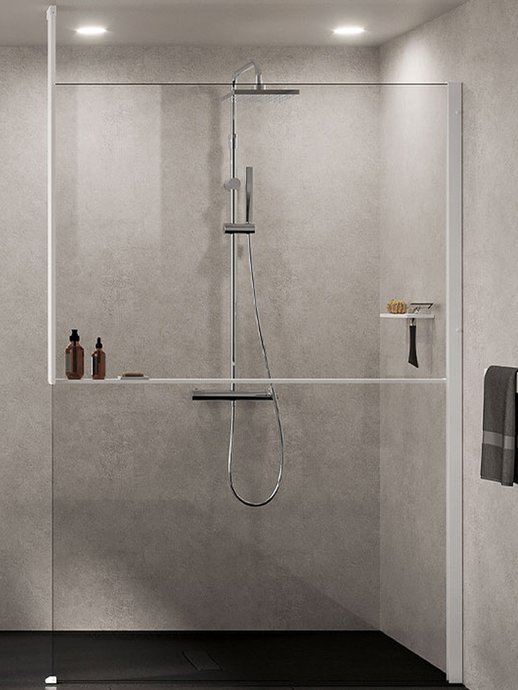
Compact shower column
In a bathroom with a small walk-in shower, every inch counts. Therefore, the faucets deserve special attention.
Compact shower columns integrate several functions into a minimal amount of space: shower head, handheld shower, and sometimes hydromassage jets. Their vertical design makes clever use of height rather than width. Some models even include built-in storage shelves, reducing the need for additional accessories.
To save even more space, consider installing concealed fixtures. This elegant solution hides the mechanism in the wall, leaving only the essential elements visible. Not only does this option free up physical space, but it also contributes to the visual purity of your modern walk-in shower.
Aesthetic tips to visually enlarge
Visual appearance plays a decisive role in how we perceive the space of a walk-in shower installed in a small bathroom. A few well-chosen decorating tips can significantly transform your limited space into a place that appears more spacious and airy.
Light colors and reflective materials
The choice of colors greatly influences our perception of space. In a small shower room, it is essential to choose light colors such as white, beige, or pastel shades. These colors reflect light and give an impression of openness and depth.
To amplify this effect, incorporate reflective materials that multiply the brightness. Glossy tiles, for example, effectively reflect light and create a feeling of expanded space. Similarly, chrome or stainless steel fixtures contribute to this impression of lightness while adding a contemporary touch to your modern walk-in shower.
Continuous tiling on floors and walls
To create an illusion of greater space, choose identical tiles for the floor and walls of your walk-in shower. This visual continuity erases boundaries and significantly enlarges the perception of space. Ideally, use large tiles with thin grout lines to minimize visual breaks.
The key trick is to make sure that your shower floor blends seamlessly with your bathroom floor. A tileable shower tray ensures perfect visual continuity, making it impossible to distinguish between the shower area and the rest of the room. This effect of uniformity greatly contributes to the impression of a more spacious bathroom.
Use of mirrors and integrated lighting
The strategic integration of mirrors radically transforms the perception of a small bathroom with a walk-in shower. A large mirror, ideally placed opposite the shower, visually doubles the space. For an even more spectacular effect, some shower walls are available with a mirror effect, offering dual functionality while enlarging the space.
Lighting also plays a crucial role in visual optimization. A false ceiling incorporating indirect lighting around the entire perimeter of the room diffuses soft light that enhances the overall decor. This solution creates a feeling of extra height and visually enlarges your walk-in shower. Recessed LED spotlights or light strips discreetly installed in niches also add interesting depth, especially in small spaces.
Technical constraints to anticipate
Installing a walk-in shower in a small bathroom requires special attention to technical aspects. These considerations, which are often underestimated, determine the success and durability of your installation.
Drainage and floor slope
Effective water drainage is the foundation of a functional walk-in shower. According to DTU standards, the floor slope must be between 2% and 3% minimum to ensure optimal drainage. In practical terms, this represents a height difference of 2 to 3 cm per meter between the highest and lowest points.
For the drainage system, there are two main options available: the floor drain or the channel drain (also known as a gutter). The channel drain, which is more decorative, generally offers a higher flow rate and can be placed against a wall or directly under the shower head. Whichever you prefer, make sure that the diameter of the drainage pipe is at least 40 mm, ideally 50 mm, to avoid any risk of flooding.
Waterproofing and water-repellent joints
The waterproofing of a walk-in shower must be flawless. Before laying the tiles, it is essential to apply a liquid waterproofing system (LWS) such as Arcacim S2 coating or a SPEC waterproofing membrane. These solutions form a protective barrier that prevents water from seeping into the underlying structures.
Pay particular attention to wall/floor joints, which are especially vulnerable to leaks. Using specific sealing strips will reinforce these critical areas. In addition, tile joints must be made with water-repellent or epoxy products specially designed to withstand constant moisture.
Available floor height
Installing a walk-in shower requires approximately 10 cm of space below floor level to accommodate the drain trap and ensure proper drainage. In renovation projects where there is insufficient height, there are two alternatives:
- First, you can opt for extra-flat plugs that only require a depth of 5 to 6 cm.
- Secondly, it is possible to raise the bathroom floor slightly, creating a small step to access the shower—a solution that, however, deviates from the original concept of a walk-in shower.
Go for a walk-in shower, even in small spaces!
Ultimately, walk-in showers are a remarkably suitable solution for small bathrooms. Contrary to popular belief, we have demonstrated that they are not limited to large, luxurious spaces. Indeed, thanks to their clean lines and floor-level installation, this option creates visual continuity that significantly enlarges the perception of space.
The various configurations presented—corner shower, with side panel, or recessed—offer the flexibility needed to adapt to virtually any space constraints. In addition, the judicious choice of elements such as an extra-flat shower tray, transparent walls, and compact faucets contributes significantly to optimizing every square inch of available space.
From an aesthetic standpoint, remember that light colors, reflective materials, and continuous tiling play an essential role in visually enlarging your space. In addition, mirrors and well-designed lighting are important for further amplifying this feeling of space.
However, the success of your project also depends on paying close attention to technical aspects. Effective drainage, perfect waterproofing, and sufficient floor height are essential prerequisites for ensuring the longevity of your installation.
So why hesitate? Even in the smallest spaces, walk-in showers add a touch of modernity and elegance while maximizing the available space. It's not the size of your bathroom that matters, but how you design it with intelligence and creativity.
Frequently asked questions
Q1. What is the minimum recommended size for a walk-in shower?
The minimum acceptable size is 80 x 80 cm, but for greater comfort, we recommend choosing dimensions of at least 90 x 90 cm. Ideally, a walk-in shower measuring 100 x 200 cm offers the best experience.Q2. How can I prevent water splashing in a walk-in shower?
To prevent water splashing, you can install a small profile around the shower. A glass wall or fixed side panel are also effective solutions for containing water while preserving the open aesthetic of the shower.Q3. What are the advantages of a walk-in shower in a small bathroom?
A walk-in shower creates a feeling of greater space thanks to its visual continuity with the floor. It also offers better accessibility, adapts to irregular spaces, and allows for aesthetic customization to visually enlarge the room.Q4. What materials are recommended for the floor of a walk-in shower?
Porcelain stoneware tiles are particularly recommended for their durability and moisture resistance. Large tiles with narrow grout lines are ideal for creating visual continuity and facilitating maintenance.Q5. What technical constraints should be considered when installing a walk-in shower?
The main technical constraints include creating a 2-3% slope for water drainage, applying an effective waterproofing system, and ensuring there is approximately 10 cm of floor space available for installing the trap and slope.