5 ideas on how to fit out an attic bathroom: step-by-step guide

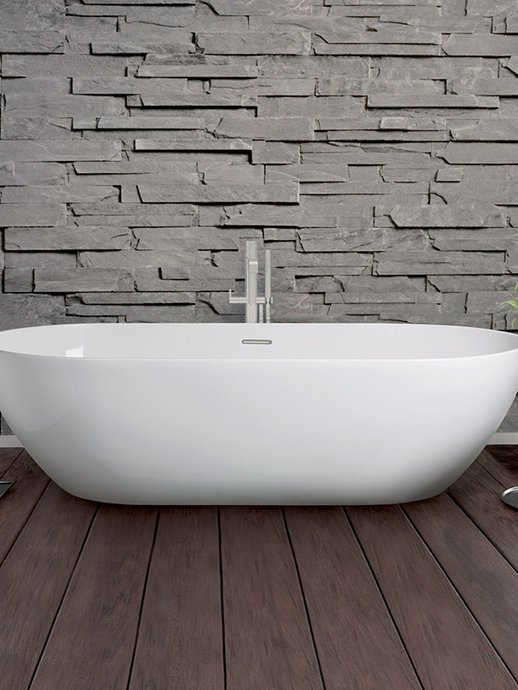
Idea 1: Install the bathtub under the slope
The bathtub is undoubtedly the ideal element to place under a roof slope in an attic bathroom. Unlike a shower or washbasin, you don't have to stand up to enjoy it to the full. What's more, this location can transform a simple bath into a unique, relaxing and visual experience.
Models for small spaces
To fit out a small attic bathroom with a bath, you have several options depending on the space available:
The undermount bath proves particularly suitable for attics. Partially recessed into the floor, it has a low visible height that integrates perfectly under slopes. It also gives an impression of space in small bathrooms, although its installation is technically more complex.
If your room has a usable corner, the corner bath offers a comfortable and relatively simple-to-install solution. Available in a range of sizes, from compact to more spacious models, it also comes in a whirlpool version for extended moments of relaxation.
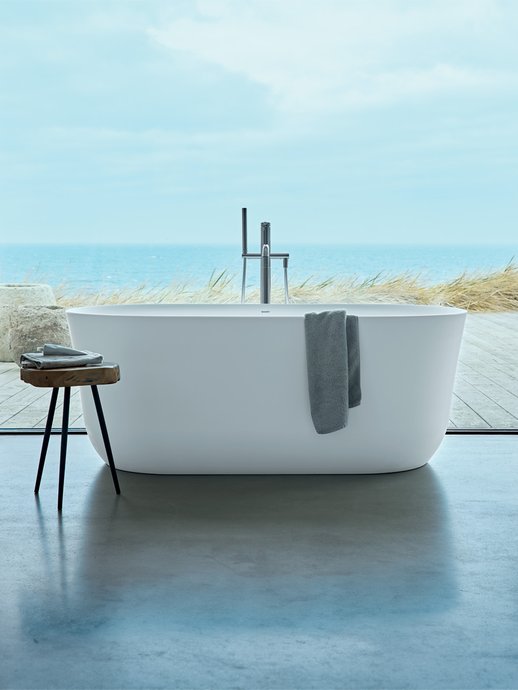
For more generous spaces, the island bathtub immediately adds cachet to your attic bathroom. Its major advantage is that it doesn't need to lean against a wall, allowing you to position it in the optimum spot under the slope. However, it does require more floor space and a potentially more complex water supply.
Positioning under a roof window
Installing a bathtub under a roof window is both a practical and aesthetic solution. For limited headroom, a height of 1.50 m is sufficient for a standard bath (if you don't plan to use it as a shower). If the bath has a shower function, a minimum height of 2 m is required.
Two main configurations are possible:
- Place the bath perpendicular to the sloping wall, against the adjacent wall or not
- Install bathtub parallel to sloping wall or directly against it
In terms of dimensions, a standard bathtub takes up approximately 1.75 m × 0.75 m, or 1.31 m². Take these measurements into account when planning your bath.
If your room has a skylight, it can provide the extra space you need to stand safely in your bathtub. The larger your roof windows, the more impressive the view from the bathtub. So bathing under a slope can become a relaxing and sometimes romantic experience, with a view of the stars.
Create a visually powerful relaxation area
To transform your sloped bathtub into a real relaxation area, play on several elements:
First, maximize natural light by installing generous skylight windows. Not only do they flood the bathroom with light, but they also make it easy to air out the room after a bath. A well-positioned window can create a real play of light on walls and coverings.
To preserve your privacy while enjoying the light, equip your windows with Venetian blinds. Their moisture-resistant aluminum slats are perfectly suited to bathroom installation.
When it comes to ambience, rely on visual contrasts: a sloping wall with panoramic wallpaper or dark paint can accentuate the room's atypical feel, structuring the volume and adding a little comfort to the whole.
Finally, to reinforce the Zen spirit, add a few tropical plants such as asplenium, fern or orchid - these varieties love humidity and light! A few strategically placed candles and a musical ambience will be enough to transform your bath into a true relaxation session.
Idea 2: Create a functional attic shower
Unlike a bathtub, installing an attic shower requires special attention to available dimensions. However, with the right technical solutions, this installation is entirely feasible and can even become a design feature in your attic bathroom.
Minimum height requirements
To create a functional shower under slope, height is the decisive criterion. Allow at least 2 meters of height to stand comfortably. This minimum height is not arbitrary: it not only allows you to stand up straight, but also to install the shower head above your head without bumping into it.
If you're considering an overhead shower with rainfall effect, even allow 2.20 meters headroom. For optimum comfort, the shower head should ideally be at least 20 cm above the head.
If the height is limited, there are several solutions:
- Install the shower in the highest area of the room
- Opt for a height-adjustable wall-mounted shower head rather than a fixed one
- Place the shower tray at the lowest point and the shower head at the highest, following the slope
Don't forget to leave at least 60 cm of clearance in front of the shower for easy entry and exit.
Walk-in shower or extra-flat shower tray
For an attic bathroom, there are two main options: the Italian shower or extra-flat tray.
The italian shower offers several advantages under the rafters. Integrated into the floor, it creates a sense of space and facilitates access without having to step over a ledge. What's more, its sleek design is perfectly suited to atypical spaces. Nevertheless, installing it in attics presents a technical challenge: creating a natural slope that requires breaking up the concrete slab is generally impossible in this configuration.
This is where the extra-flat shower tray comes into its own. With a height of just 4 to 6 cm once installed, it offers an ideal alternative for creating the effect of a walk-in shower without the technical constraints. These trays offer several major advantages:
- Easier installation, with no need for major excavation of the ground
- Easier to guarantee watertightness
- Bungs with a very large diameter (around 90 mm compared with 60 mm for standard models) to ensure optimum flow despite the shallow depth.
What's more, these trays already incorporate a drainage slope, avoiding the complexities of traditional installation. Corner shower trays are particularly suitable for small spaces, making the most of every available centimetre.
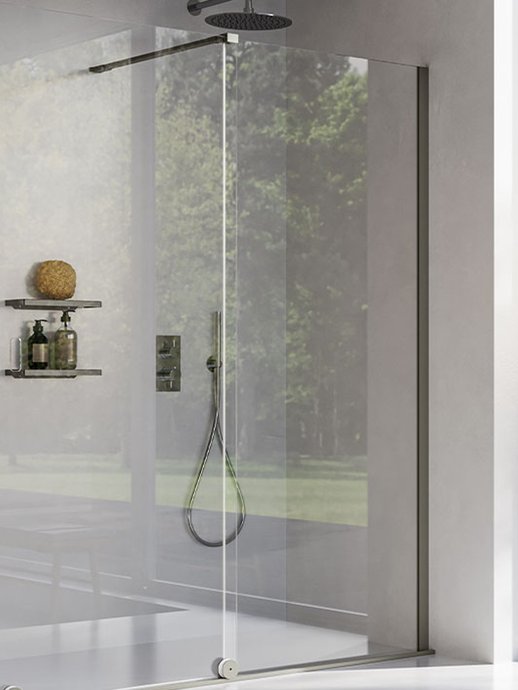
Made-to-measure enclosures for sloping walls
When faced with the constraints of sloping walls, standard shower enclosures are generally unsuitable. Fortunately, several manufacturers offer made-to-measure solutions specially designed for sloping roofs.
These customised walls fit perfectly into the atypical angles of your attic bathroom. Manufactured mainly from toughened glass that complies with European EN 12150 standards, they guarantee strength and safety.
There are three main configurations to choose from:
- The fixed enclosure parallel to the sloping wall: ideal for creating an open-plan walk-in shower, it can be fixed to the opposite wall using a stabilising bar without the need for an attachment.
- The made-to-measure enclosure perpendicular to the slope: used to create a corner walk-in shower, exploiting the area where there is sufficient height.
- The recessed enclosure between three walls: particularly effective for exploiting difficult corners, this solution maximises the space available while offering a sleek design.
For best results, don't hesitate to call on the expertise of a professional who will take the exact measurements of your attic space. Some manufacturers even offer online configurators so you can visualise your project in 3D before taking the plunge.
Finally, to add the finishing touch to your sloped shower, consider the customisation options: clear, satin-finish or screen-printed glass, anti-limescale treatment for easy maintenance, and accessories such as chrome or matt profiles to match your decorative style.
Idea 3: Save space with clever storage solutions
In an attic bathroom, optimising space is essential to creating an environment that's both functional and pleasant. Intelligent storage is therefore a key element of your layout, making the most of every available square centimetre, even on the steepest slopes.
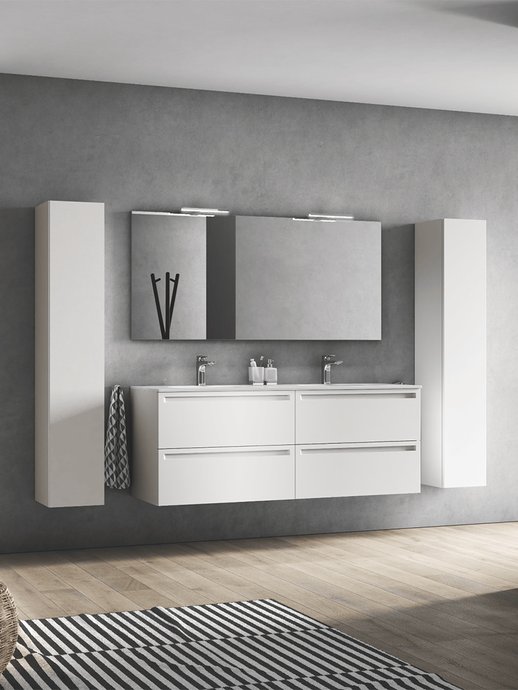
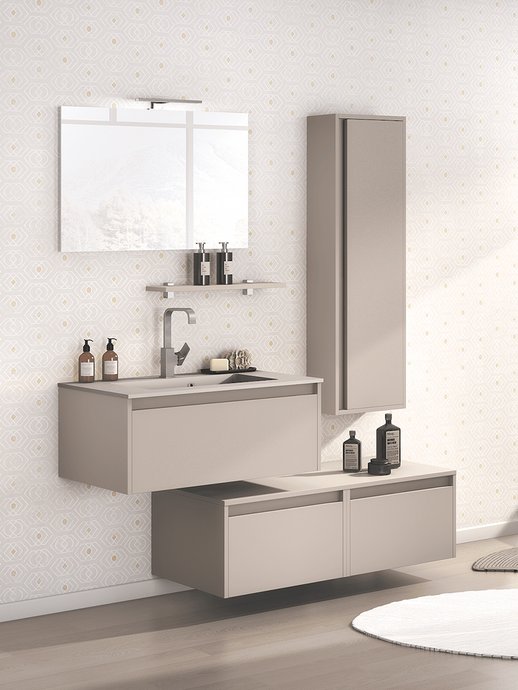
Wall and wall-hung units
Wall-hung furniture is an elegant and practical solution for freeing up floor space in your attic bathroom. By opting for wall-mounted furniture, you immediately create a feeling of space and lightness. What's more, the floor is much easier to clean.
Wall-mounted columns are particularly suited to high areas of your bathroom, where there is sufficient headroom. For a harmonious look, coordinate them with your vanity unit.
For low areas, choose low columns that fit perfectly under the slope while creating considerable storage space in a style that's consistent with the rest of your bathroom.
Built-in storage under the slope
The best way to make the most of space under slopes is to create custom-made built-in storage units. A jamb wall transformed into a cupboard or shelf offers ideal extra space for towels, beauty products or decorative objects.
Recessed deep drawers are particularly effective because they make full use of the available space. A three-drawer pedestal integrated into the partition can make the most of space usually lost under the slope.
For small attic bathrooms, consider storage benches positioned in front of the jamb wall. These multifunctional elements serve as both seating and storage space - some models can even be heated for added comfort.
Making the most of every unused corner
In an attic bathroom, every nook and cranny counts. Here are a few ideas for leaving nothing to chance:
- Install a laundry basket integrated into a storage column with a rail system placed on the back of the door.
- Create backlit wall niches that provide storage, rhythm and depth at the same time
- Use shelves built into the walls or under the slope to store towels and toiletries.
For particularly tight spaces, consider a staircase unit that adapts perfectly to height constraints. These made-to-measure solutions make full use of the atypical geometry of the attic, while adding a unique aesthetic touch to your attic bathroom.
Finally, don't forget the little practical details like adding extra storage with a drawer on the side of the bath - a simple but effective trick for gaining even more storage space.
Idea 4: Bring in light and enlarge visually
Natural light is a fundamental element in enhancing an attic bathroom. Beyond the aesthetic aspect, it visually enlarges the space and creates a welcoming atmosphere, even in the most restrictive configurations. Let's take a look at how to maximise this precious asset.
Roof windows and suitable blinds
Roof windows are perfect for an attic bathroom: as well as flooding the room with natural light, they provide excellent ventilation by evacuating the warm, moist air that naturally rises to the top. They also free up the walls, providing valuable space for installing sanitaryware, furniture and accessories.
For optimum thermal comfort, external sun blinds are an ideal solution. They block the sun's rays before they reach the glazing, preventing overheating while letting in light and preserving privacy. Inside, aluminium Venetian blinds are perfectly resistant to humidity and allow you to direct the light to suit your needs.
Light colours and XXL mirrors
In an attic room, opt for light colours that reflect the light better and make the space look bigger. White, cream, light grey or pastels such as pale blue make the room brighter and more welcoming. However, avoid materials that are too shiny, which can create visual discomfort in a space with little natural light.
A large mirror is an essential element for visually enlarging an attic bathroom. It floats along the walls and reflects the light, creating a wonderful illusion of space. There are several options to choose from:
- An XXL mirror above the vanity unit
- Two mirrors placed face to face to create an infinity effect
- A composition of several mirrors on an entire wall for a bohemian or vintage style
Glass walls for greater transparency
Transparency is your best ally when it comes to making an attic bathroom more fluid. By opting for transparent glass shower enclosures, you avoid compartmentalising the space and create a continuous visual flow.
Choose enclosures with no visible frame or minimalist profiles for a sleek look. Transparent glass, which may be anti-scale, allows light to circulate freely throughout the room. For a modern touch, some manufacturers offer subtle tinted glass that preserves transparency while adding a decorative touch.
By combining generous windows, light colours and transparent elements, your attic bathroom will be considerably larger and brighter, transforming architectural constraints into real decorative assets.
Idea 5: Mixing shower and bath in a small attic bathroom
Why choose between a shower and a bath when you can enjoy both, even in an attic bathroom? Because their uses are different, depriving yourself of one of the two facilities means giving up specific moments of well-being.
Combined layout in a large room
In a spacious attic bathroom, there are a number of ways to harmoniously integrate shower and bath. The "straddle" position is particularly ingenious: the bath is placed between the shower area and the rest of the room, partitioned off in the middle by a glass wall. This installation does not necessarily require a walk-in shower, which limits the amount of fitting work required. The same shower head can be used for both installations.
To create visual unity, create continuity between the two elements. Install the shower cubicle next to the bath, separated only by a glass wall. The wall tiles can be extended across both installations, while the floor retains a uniform covering. This approach works perfectly in both small and large bathrooms.
Another solution is to completely enclose the bath in the shower cubicle. Fully glazed, this configuration creates a dedicated "wet" area, preventing water splashing into the rest of the room. What's more, this layout means that waste water drains can be shared.
Creating a master suite under the eaves
Creating a master suite with bathroom in the attic offers a private space away from the hustle and bustle of the family. The space is generally larger than on the floor below, and the light coming in through the roof windows creates a particularly pleasant atmosphere.
To achieve this, start by thinking about how the space will flow. Draw the area where the ceiling height exceeds 1.80 m and the arrival of the staircase. Then position the shower and bath judiciously, depending on the architectural constraints.
However, if space is at a premium, 2-in-1 baths are an interesting alternative. These versatile models combine the pleasure of a relaxing bath with the practicality of a shower, optimising space without compromising comfort. Available in a range of designs and materials, they can be adapted to suit your decorative style.
Designing an attic bathroom brings exceptional creativity
First, we looked at how the bathtub naturally finds its place under the slopes, creating a unique and cosy relaxation area. Then we looked at the technical requirements for installing a functional shower, despite height constraints. Clever storage is undoubtedly the key to making the most of every available square centimetre, thanks in particular to built-in and made-to-measure solutions.
In addition, natural light and the judicious use of mirrors can visually enlarge the space, transforming a constraint into a real decorative asset. Finally, even in a small space, combining a shower and a bath is perfectly feasible with the right layout tips.
Don't forget that every attic bathroom has its own special features. So adapt this advice to your specific configuration. The most important thing is to design a space that reflects your personality, where functionality and aesthetics are in perfect harmony.
Now you have all the keys you need to create an attic bathroom that's both practical and elegant. Embark on this exciting project and turn your architectural constraints into real sources of inspiration!
Frequently asked questions
Q1. What is the minimum height required to install a shower in an attic bathroom?
For a functional shower in the attic, allow for a minimum height of 2 metres. This allows you to stand comfortably and install the shower head above your head without the risk of bumping.Q2. How do you optimise storage in a small attic bathroom?
Use wall-hung units to free up floor space, create bespoke built-in storage under slopes, and exploit every nook and cranny with shelves or niches. Solutions such as deep built-in drawers or storage benches are particularly effective.Q3. What are the best options for bringing light into an attic bathroom?
Roof windows are ideal for flooding the room with natural light. Opt for light colours that reflect light, install large mirrors to visually enlarge the space, and favour transparent shower enclosures for better light circulation.Q4. Is it possible to install both a shower and a bath in an attic bathroom?
Yes, it is possible even in a restricted space. You can opt for a combined layout where the bathtub is placed next to the shower, separated by a glass partition. For more limited spaces, 2-in-1 baths offer a practical solution combining shower and bath.Q5. How do you ensure good ventilation in an attic bathroom?
Install an efficient CMV for effective air renewal. If you have roof windows, choose models that open by rotation for better air circulation. Good ventilation is crucial to avoid condensation and the appearance of mould in this potentially damp space.